Nice open source Applications created in Ruby on Rails

Hi….today i just seen the applications which are all created in Ruby on Rails.

Here are the few applications created by ruby rails

1) Notes

Notes is an open source (Reciprocal Public License) Ruby on Rails application designed to be a simple and fast to-do and notes manager.

2)Tracks

A to-do-list manager with a clean interface. Tracks lets you to categorize, prioritize, schedule & star items for a better usability .

Interface is Ajaxed & many tasks are done by drag’n drops. The application has multi-user support & comes with a built-in web-server for user who want to install it to their computers.

3) Mephisto

A widely used blogging engine that has ready-to-use plug-ins..

It uses Liquid templates for creating & editing themes. Mephisto also has a built-in caching system for faster loading.

4) Gallery

A simple but functional photo gallery built with Ruby on Rails.

It uses the lightweight mini_magick to resize photos, reducing the memory requirements of the full RMagick suite.

Photos can be sorted by drag’n drops, captions can be edited easily & the look/feel can be customized via CSS.

5) Spree

Spree is a highly extensible & customizable e-commerce application. Developers can easily override existing views, provide new ones or provide additional models, migrations and controllers

6) Ecompages

EcomPages is an e-commerce application which has most of the basic features of an e-store.

It has a good looking admin interface that makes managing products & orders easier.

The application is still being developed & is not feature-rich but can be a good base to start with & improve further.

7)  EchoWaves

This is a group chat social network application. You can start conversations and connect wih other users while discussing it.

It is possible to make a conversation read-only for presenting a content too.

8) Communityengine

A plugin for Ruby on Rails applications for having the features of a social netwoking website instantly.

Some great features include:

  • Authentication (sign up, log in), user search & user profiles
  • Blogs with tagging, categories and rich text editing
  • Photo uploading and tagging
  • Commenting, forums, friendship, activity feeds & more

9) Rubyurl

RubyURL is an online tool for converting long website addresses into short ones.

Besides the standard form input, it is possible to create short URLs via the REST API which supports both JSON & XML requests.

10) Mailr

Mailr is an open source webmail application that can be used with any IMAP server.

E-mails can be created both in HTML & plain text. E-mail addresses in the contact list are Ajax-auto-completed just like Gmail & more.

11)  Warehouse

This is a beautiful web-based subversion browser built with Ruby on Rails.

Multiple repositories can be managed from the same interface. Also, it is possible to add any number of users with different permissions.

12) typo

A Ruby on Rails blogging application that is developed continiously.

It comes with theming & plugins support for easier customization. Every part is planned for a better SEO, like friendly-URLs, ability to add keywords/description to every category/page & more.

Thanks for reading. Enjoy the framework with Rails …:)

How to add Gravatar to the user in Ruby on Rails

HI…to all today i learnt how to set Gravator to the user.. Lets create a rails project like this.. $ rails new gravator

$ cd gravator

now create a scaffold for the gravator by

$ rails g scaffold users avator email:text

now migrate db and run server

$ rake db:create

$ rails s 

now open browser and add few users localhost:3000/users

now we have to add gravatar to the user..

open app/helper/application_helper.rb

module ApplicationHelper
  def avatar_url(user)
    gravatar_id = Digest::MD5::hexdigest(user.email).downcase
    "http://gravatar.com/avatar/#{gravatar_id}.png"
  end
end

apps/views/users/index.htnl.erb

<% @users.each do |user| %>
<%= image_tag avatar_url(user) %>
<%= user.email %><%= link_to 'Show', user %><%= link_to 'Edit', edit_user_path(user) %><%= link_to 'Destroy', user, :method => :delete, :data => { :confirm => 'Are you sure?' } %>
<% end %>

Now run the server by rails s

output:

Thats it…now we added gravatar to the user…Thanks …

Bootstrap Twitter in Rails

Hi…to all to day i learned Bootstrap from Twitter in rails application…

Before getting into session first ,let we  know about twitterbootstrap..It helps to build beautiful web applications..It provides variety of CSS and Javascripts for  making layouts,navigations.lot more etc..

Now, we ll create a simple application to store the products and price in a shop and then add TwitterBootstrap..

we ll call the app as store and create scaffold named Product model to do some work

$ rails new store

$ cd store

$ rails g scaffold product name:string price:decimal –skip-stylesheets

$ rake db:migrate

Note: we skipped stylesheets because we are going to use Bootstrap’s stylesheets,css,etc..

now you can see the page as like this..

now.we have to add Bootstrap to this application..

open Gem file

  1. # Gems used only for assets and not required  
  2. # in production environments by default.  
  3. group :assets do  
  4.   gem ‘sass-rails’,   ‘~> 3.2.3’  
  5.   gem ‘coffee-rails’, ‘~> 3.2.1’  
  6.   
  7.   # See https://github.com/sstephenson/execjs#readme for more supported runtimes  
  8.   # gem ‘therubyracer’  
  9.   
  10.   gem ‘uglifier’, ‘>= 1.0.3’  
  11.   gem ‘twitter-bootstrap-rails’  
  12. end

now bundle it and install Bootstrap Twitter

$ bundle install

$ rails g bootstrap:install

this file will be installed in assests/bootstrap_and_overwrites_css.less

now if yuo run the server u can feel difference ..Now our page looks like this…


now we can improve our layout by bootstrap..

app/views/layout/application.html

add <div class=”container”>  in body of the file.

now we are going to add sidebar to our page

/app/views/layouts/application.html.erb

<div>
  <div>
    <div><%= yield %></div>
    <div>
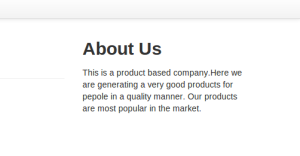
      <h2>About Us</h2>
      <p>This is a product based company.Here we are generating a very good products for pepole in a quality manner. Our products are most popular in the market.</p>	
    </div>
  </div>
</div>

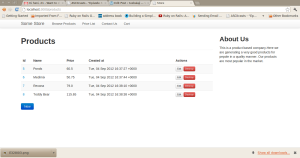
now you can see the about us as sidebar in our app like this

Finally we are going to add the navigation bar such as somestore,contact us..etc

add these lines on top of the body of the file /app/views/layouts/application.html.erb

  • <div class=”navbar navbar-fixed-top”>  
  •   <div class=”navbar-inner”>  
  •     <div class=”container”>  
  •       <a class=”btn btn-navbar” data-toggle=”collapse” data-target=”.collapse”>  
  •         <span class=”icon-bar”></span>  
  •         <span class=”icon-bar”></span>  
  •         <span class=”icon-bar”></span>  
  •       </a>  
  •       <a class=”brand” href=”#”>Some Store</a>  
  •       <div class=”nav-collapse”>  
  •         <ul class=”nav”>  
  •           <li><%= link_to “Browse Products”, products_path %></li>  
  •           <li><%= link_to “Price List” %></li>  
  •           <li><%= link_to “Contact Us” %></li>  
  •           <li><%= link_to “Cart” %></li>  
  •         </ul>  
  •       </div>  
  •     </div>  
  •   </div>  
  • </div>  

now if you run the server you can see the navigations bar in our application…

Final Tweaks to The Header

Our application’s layout file is pretty much complete now but there are a couple of thing we need to add in the head section to ensure that it works everywhere.

/app/views/layouts/application.html.erb

<head>
  <title>Store</title>
  <!--[if lt IE 9]>
    <script src="http://html5shim.googlecode/svn/trunk/html5.js" type="text/javascript"></script>
  <![endif]-->
  <%= stylesheet_link_tag    "application", :media => "all" %>
  <%= javascript_include_tag "application" %>
  <%= csrf_meta_tags %>
  <meta name="viewport" content="width=device-width, initial-scale=1.0">
</head>

the above code for HTML5 support and mobile behaviour .

Next we’ll use Twitter Bootstrap to improve the look of this page. Instead of walking through each change manually we’ll use one of the generators provided by the gem.

$ rails g bootstrap:themed products -f

now run server by $ rails s

after adding products and price to our store apllication ..Our application looks like this…

Thats it…Thanks to all….happy times!!!!!

Sending emails using gmail in Rails

Hi…to all today i learned how to send emails using gmail in rails

here are the steps

Create application using

$ rails new mailit

change the directory using      $ cd   /mailit

next create the scaffolder name User with name and email

$ rails g scaffold user name:string email:string

then run the database migrations

$ rake db:migrate

next we have to do configuration settings for gmail

create a file in  config/initializers named setup_mail.rb  

ActionMailer::Base.smtp_settings = {
:address => “smtp.gmail.com”,
:port => 587,
:domain => “mail.google.com”,
:user_name => “username@gmail.com”,
:password => “yourpassword”,
:authentication => “plain”,
:enable_starttls_auto => true
}

now we completed the configuration ,now generate the mailer using

$ rails g mailer user_mailer

this will create the user_mail.rb in  /apps/mailer

now add the following code in to that file

  1. class UserMailer < ActionMailer::Base  
  2.   default :from => “user@gmail.com”  
  3.   
  4.   def registration_confirmation(user)  
  5.     mail(:to => user.email, :subject => “Registered” , :body =>”Thanks for registering”)  
  6.   end  
  7. end

create textfile named regisetration_confirm.text/erb in apps/views/user_mailer

Thanks for registering!!!

Add the following line to the  /app/controllers/users_controller.rb

UserMailer.registration_confirmation(@user).deliver

def create
@user = User.new(params[:user])

respond_to do |format|
if @user.save
UserMailer.registration_confirmation(@user).deliver # added line 
format.html { redirect_to @user, :notice => ‘User was successfully created.’ }
format.json { render :json => @user, :status => :created, :location => @user }
else
format.html { render :action => “new” }
format.json { render :json => @user.errors, :status => :unprocessable_entity }
end
end
end

Thats it ..now rin the server by $ rails server 

then give name and emailid to which you have to send email..

then click create button ,now you will see like this

now go to your mail and check your inbox

Thanks to all…happy times!!!!

Display Time ,date ,Year in web page in rails

Hi ..to all ..today i’m going to tell how to display  time ,date,year in a web page in rails..

Its very simple..here are the steps…

Refer my previous post to create listing posts application in rails

I created application with name as myblog .

change to  $ cd /myblog

go to  myblog/app/views/home/index.erb

add this line <p> Its time now  <%= Time.now %></p>

now run the server by   $ rails server

open your browser and type http://localhost:3000

now you can see time and date and year in you web page like this..

Thanks …

Creating a sample application for creating,listing posts

Hi ..to all today i learned a how create listing, posting,deleting posts for a simple blog application..

$ rails new myblog

$ cd myblog

then we have change the normal welcome page of the ruby..to do this generate controller by

$ rails generate controller home index

now go to the file myblog/app/views/home/index.erb type this

<h1>Hello, Rails!</h1>

<%= link_to “My Blog” , posts_path %>

now go to /config/routes.db and do the following change in line

# You can have the root of your site routed with “root”

# just remember to delete public/index.html.

root :to => ‘home#index’

now delete default application page using command

$ rm public/index.html

now create scaffolding using the command

$ rails generate scaffold Post name:string title:string content:text

now run the create db and migrate command

$ rake db: create

$ rake db: migrate

now our application is ready with posts.

Start the server using

$ rails server

open your web browser and type in the address bar http://localhost:3000 now you can see the page like this after clicking the My blog link

Posts Index screenshot

Thanks to all…now you can create new posts and list the posts,edit,delete your posts..

Hello world in rails

hi..to all today we will see how to do hello world in rails

Create new application by open terminal and type the command as

$ rails new hello

$ cd hello

$ rails server

now all we need do is,change the welcome page to hello world , here are the following steps

create controller for our application using the command

$  rails generate controller home index

now go to app/views/home/index.html open with text editor and type

<h1>hello rails<h1>

save the file.

Setting the Application Home Page

Now we have to change the normal welcome board page to our hello world page

Open the config/routes.rb with text editor do the following change in root_to

  Hello::Application.routes.draw do
  # You can have the root of your site routed with “root”
  # just remember to delete public/index.html.
  root :to => ‘home#index’

finally open terminal and type the command as

$ rm public/index.html

now run the rails server page localhost:3000

Image

It shows hello rails.

Thats it.. thanks to all..

Java script error while running rails server

Hi..to all today i got javascript error while starting the rails server after creating a simple application.

This error is runtime error due to javascript

The solution to this problem is to install node.js in our system.

To install node.js in ubuntu do the following

Download the latest node.js file from node.js

after downloading extract that file using

tar xzvf node-v0.8.6.tar.gz

./configure

make install

now we successfully installed node.js in our system..now you can run the rails server using

rails server

it shows the starting of the server like this

/usr/local/lib/ruby/1.8/webrick/httpservlet/cgihandler.rb:20: Use RbConfig instead of obsolete and deprecated Config.
=> Booting WEBrick
=> Rails 3.2.8 application starting in development on http://0.0.0.0:3000
=> Call with -d to detach
=> Ctrl-C to shutdown server
[2012-08-16 13:13:19] INFO WEBrick 1.3.1
[2012-08-16 13:13:19] INFO ruby 1.8.8 (2012-07-27) [i686-linux]
[2012-08-16 13:13:24] INFO WEBrick::HTTPServer#start: pid=2621 port=3000

now you can run the server in browser by run server

Thanks to all..

Getting started with ruby on rails

Hi ..to all today i learned how to create a simple ruby application ..

here are the steps

Open terminal and type

rails new my_app[application name] 

we can’t give any name as application name..since ruby has some inbuilt app name such as test,script..etc

after bundle is created in your system it shows bundle is successfully installed in our system .Then

change the directory to created application by

cd my_app

now we have to start the rails server ,to start rails server type the following command

rails server


now open your web browser and type the  following

http://localhost:3000

it will display the welcome page about your application environment like this in our system


Image

Thanks to all..

Install- Ruby- on -Rails in ubuntu 10.04

Hi..to all yesterday i had  learnt to install ruby on rails in ubuntu..

here are the following steps.

Before installing rails make sure ruby is installed in your system.To check whether ruby installed in your system Open terminal and type

$ ruby -v

ruby 1.8.8dev (2012-07-27) [i686-linux]

It shows the version of the installed ruby in your system.If shows error or command not found you have to install ruby by the following command

sudo apt-get install ruby

after installing ruby we have to install gems to install rails

download the latest version of rubygems from rubyforge

after downloading rubygems in .tar or .zip

we have extract that file by the following

tar xzvf rubygems-1.3.2.tgz

cd rubygems-1.3.2

sudo ruby setup.rb

now we successfully installed gems in our system.Now we are going to install rails in our system

To install rails type the following command

 sudo gem install rails 

By default, ruby on rails support sqlite3 under development environment. However, in order to use that, you need to install sqlite and sqlite-ruby gem first.

sudo apt-get install sqlite3 

Now we successfully installed rails in our system to check this,Open terminal and type

rails -v

Rails 3.2.8

it shows the version of installed rails in our system.

Thanks to all …